
This post may contain affiliate links. For more information, please see our disclosure policy.
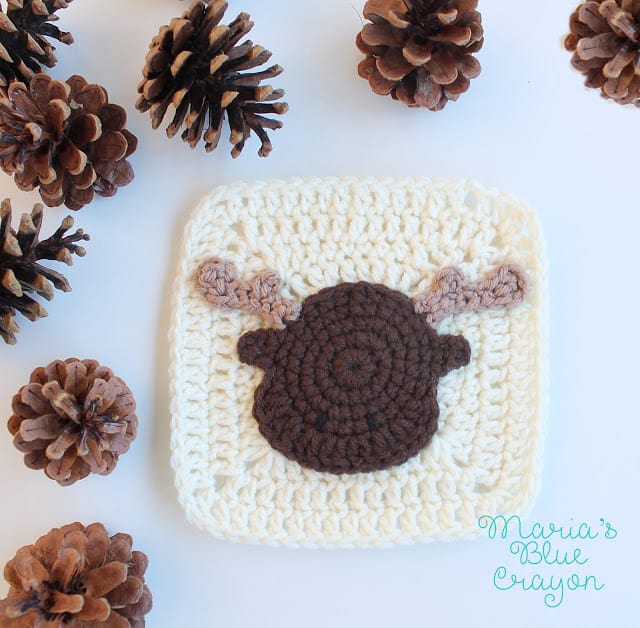
The crochet moose applique is part of the Woodland Blanket. Find the written pattern and video tutorial below.
Crochet Moose Applique Video Tutorial
If you are unable to view the video below this message, you can view it on YouTube.
CROCHET MOOSE APPLIQUE WRITTEN PATTERN
Materials
Worsted weight yarn in brown, taupe, black
G/4.00mm hook
Tapestry Needle
Scissors
Special stitches
SC foundation crochet
Abbreviations (US terms)
Ch = chain, sc = single crochet, hdc = half double crochet, dc = double crochet, st = stitchPattern
Head
Row 1: Magic ring, ch 1, 12sc in ring, join to first st
Row 2: Ch 1, sc in next 3 st, 2sc into each of the next 3 st, sc into next 3 st, 2sc into each of the next 3 st, join to the first st
Row 3: Ch 1, sc into next 6 st, 2sc into each of the next 3 st, sc into the next 6 st, 2sc into each of the next 3 st, join to first st
Row 4: Ch 1, sc in each st around, join to first st
Row 5: Ch 1, sc in next 7 st, hdc in next st, 2dc in each of the next 8 st, hdc in next 2 st, sc in remaining st, join to first st
Fasten off and leave long tail for sewing.
Antlers
We will be working the horns in the 4th and 5th stitches to the right (right horn) and the 4th and 5th stitches to left (left horn) of the space where we joined for the head. Because we are working in the round and from right to left, where we start the left and right horn will be a slightly different. Pay attention to what # stitch you are inserting your hook into.
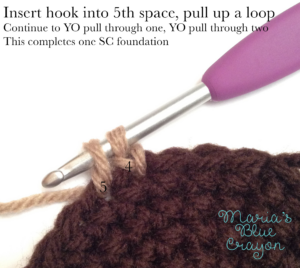
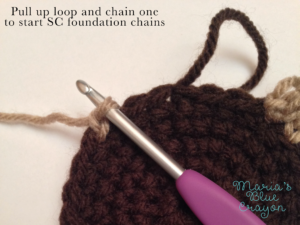
*I have provided pictures below to help aide you in starting the horns (specifically shown for the left antler)
Right Antler:
Insert your hook into the 5th space to the right of the join and attach taupe color. Chain 1 to secure, insert and pull up a loop into space to the left (4th space to the right of the join). **YO pull through one, YO pull through both loops. (That completes your first SC foundation) Continue to SC foundation crochet until you have 6 SC foundation crochets. Ch 4, treble crochet into SC foundation nearest to chain, Sl st into same space, Sl st into next two spaces, [sl st, ch 2, dc, sl st] all into next space. Slip stitch until you get back to the head portion. Slip stitch into 4th space to the right of the join on the head portion. Fasten off and leave tail for sewing onto granny square.
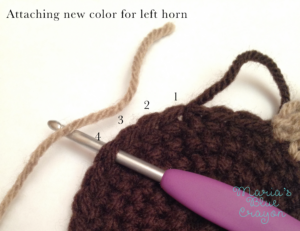
Left Antler:
Insert hook into 4th space to the left of the join, attach taupe color. Chain 1 to secure, insert and pull up a loop into the space to the left (5th space to the right of the join). Follow direction from ** for the right horn. For the left antler, you will need to turn your work after making your foundation single crochets to ensure the antler nubs stick up.
Love this! I have a friend who owns a little cabin in the woods. This wlll be perfect! Thank you for sharing.
You're welcome! Sounds like the perfect gift for her little cabin 🙂
I love this pattern! I am excited to learn it! I am just a little confused, when it says "3sc, 2sc in the next 3 spaces" does it mean 5 sc in each?
Sorry for the confusion! I think you are referring to Row 2? Correct me if I'm wrong. So basically, you will single crochet for 3 stitches and then for the next 3 stitches you will have 2 single crochets in them each.
Hope that helps!
Yes!! Thank you, I understand now (:
So cute! Just an FYI, moose have antlers, not horns 🙂
Loving this afghan. But I'm having a little problem with the horns. Could you maybe post step by step pictures? Or explain maybe in more detail? I'm not sure why I cant get them to work. Thank you
Mine aren't working out right either 🙁
Is there a particular part that you're stuck on? I realize in the left antler, I didn't specify that you will have to turn your work after the single crochet foundations in order to have the points of the antler facing upwards. I will work on getting a photo tutorial together for further clarification 🙂
I found a video that explained foundation chains and that helped. And I did the left antler by turning my work and working from behind. Both came out good. Plus I made this much smaller as I'm putting it on a hat.
These patterns are amazing! For what it’s worth, I am a lefty, and I did the antlers backwards from the pattern and they worked for me. Thank you for such clear instructions.