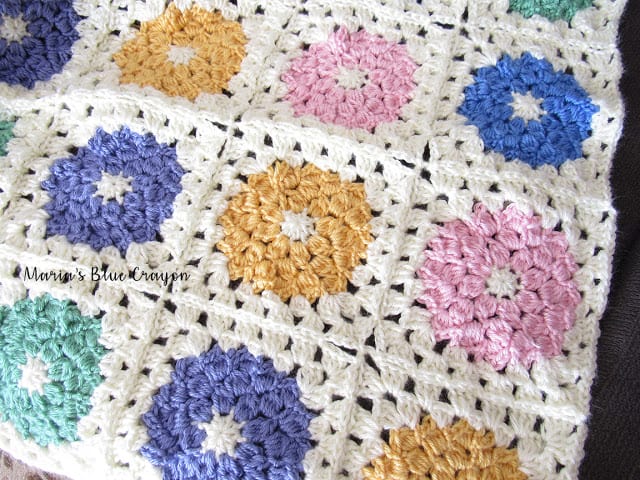
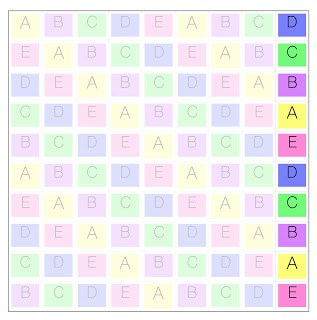
In this post you will find the weekly instructions/layout for this Spring Afghan crochet along! Find all the information and materials list here.
Because the project consists of the same granny square, I will be releasing the layout in parts weekly! Each week we will be making 10 squares and joining them as you go (or which ever method of joining you prefer!) After 9 weeks, we will have an afghan for spring! (10 squares x 9 weeks = 90 squares!)
You can purchase the ad-free PDF version here.
PDF version includes the complete layout along with a blank layout if you choose to come up with your own layout. *It will not come with join as you go instructions – there will be a video for that!
Important Notes
READ THIS BEFORE YOU START!
There are five different colored flowers for this afghan, and I know not everyone will be using the same colors as I chose so I will be referring to these colors as color A, B, C, D, and E. Make note of what color you are using for each letter so you don’t forget!
Following the layout I assigned my yarn colors as follows: A = sunshine, B = lavender, C = sage, D = lavender blue, E = soft pink. (This is just for reference if you want to go by exactly how I made my afghan).
If you are new to using the join as you go method, please watch the video on joining before you complete your squares if you’ve never used this method before! We will literally join as we go. After making one square, you will start joining the second square before completing (if that’s confusing – you’ll understand once you watch the instructions!)
Tips
Weave in as you go! (Cliche, I know.) Joining as you go method works smoothly and nicely when you don’t have pesky ends to work around. Try to weave in after each join.
When weaving in the tail from the magic ring, make a knot (or two) around a stitch to make it secure. Magic rings are known for coming undone after much use/washing.
If you are using Caron Simply Soft, they have nice center pulls. You can keep the yarn labels on and mark your colors A, B, C, D, E. This will help you when referring to the layout.
If you have questions, consult the Maria’s Yarn Friends Facebook group! We have lots of crocheters working on this project, so someone may be able to answer you quicker than I can 🙂 You can also email me if you aren’t on social media! [email protected]
Find the Granny Square Pattern here
Find the Join as You Go Method here


Hello There,
I just had to join your CAL! It's so pretty! After chemotherapy, I find that learning new patterns can be a bit of a struggle. But, your project is so beautiful, that I persisted and now I can make up the flowers easily! I encourage everyone to try this lovely pattern! I blogged about it at: https://faithtrustandbreastcancer.blogspot.com/2018/01/saturdays-song-sunday-slow-stitching.html! I'll continue featuring your blog as I continue to make progress. You are an amazing creator, pattern writer and teacher via video as well! Thank you so much!
Hi!
I just love this blanket! It's so bright and cheerful! I am just finishing up my last row and wondering if you are going to add a border or have any suggestions for a border. I've looked at some of the ones posted on facebook. Hoping you have some ideas also!
Maria, every time I click the link for the Granny Square pattern, I’m directed to the farm blanket join and border link instead.
Thanks for letting me know! Try this link: https://mariasbluecrayon.com/2018-01/spring-flower-granny-square-crochet/
Another tip to keep your magic rings from coming undone is to use a “locking” or “double” magic ring. It’s exactly the same, but you wrap your starting yarn around twice instead of just once. Here’s a link to a video tutorial I used.
https://youtu.be/KhLdNp56P6s