• Skip to primary navigation
  • Skip to main content
  • Skip to primary sidebar

Maria's Blue Crayon

  • Free Crochet Patterns
  • Crochet Tips
  • Printables
  • Privacy Policy
  • About Me/Contact
  • Navigation Menu: Social Icons

You are here: Home / crochet / Halloween Ghost Granny Square Crochet Pattern

Halloween Ghost Granny Square Crochet Pattern

July 7, 2018 by Maria Weaber 3 Comments

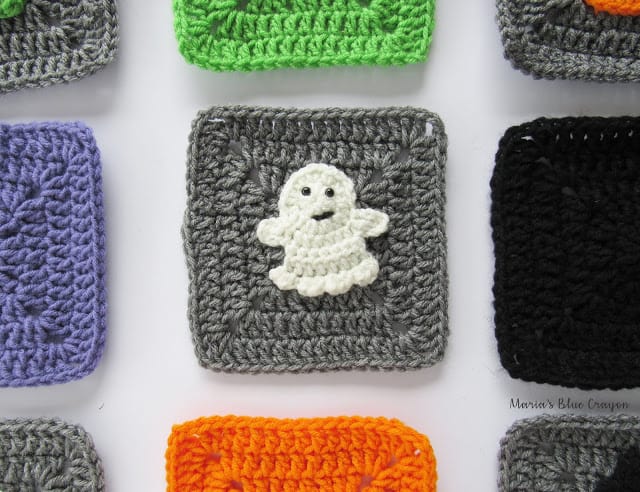
This little ghost is part of the Halloween Granny Square Blanket. Click here to go back to other squares.
Week #1 Assignment: Make 4 gray square, 4 purple square, 4 ghosts and sew them onto the gray squares.
This little ghost is easy and quick to make! Find the free crochet pattern below or use the video tutorial to make this ghost applique!


Free Pattern

Ghost applique

Materials
White and black yarn
G/4.00mm hook
2 6mm safety eyes
Tapestry needle
Scissors
Notes
Beginning chains do not count as stitch
Abbreviations (US terms)
Ch = chain, hdc = half double crochet, tr = treble crochet, st = stitch(es), sl st = slip stitch
Using white yarn
Round 1: Magic ring, ch 1, 10 hdc in ring, join to first hdc
Round 2: Ch 1, 2hdc in each st, join to first hdc
Row 3: Ch 1, hdc in next 7 st, turn
Row 4-5: Ch 1, hdc across, turn
Row 6: Ch 1, *3hdc, sl st, repeat from * , 3hdc in last st
Fasten off, leave tail for sewing onto gray granny square
Arms
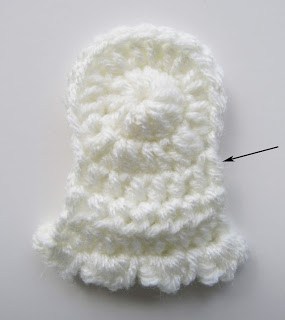
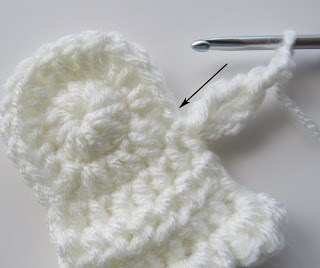
Attach white yarn to right side of ghost body on the side of Row 3 (See photo 1 & 2)
Ch 3, tr in same st as ch 3, ch 3, sl st into next st
Fasten off
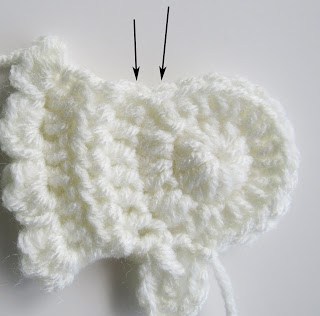
Attach yarn to left side of ghost head (see Photo 3)
Ch 3, tr, ch 3 in same st as ch 3, sl st into next st
Fasten off
Face
Attach 6mm safety eyes
Use black yarn and tapestry needle to sew on mouth

Photo 1 shows where yarn will be attached for right arm of ghost (side of row 3).

Photo 2 shows where to slip stitch when slip stitching into the next stitch to complete the arm.

Photo 3 shows where to attach yarn (right arrow) and where to slip stitch (left arrow) to finish up the left arm.

Find the video tutorial on how to sew appliques onto the granny square here.

Granny Square

Use J/6.00mm hook 
Chain 2 in beginnging of round does not count as stitch
Abbreviations (US terms)
Ch = chain, dc = double crochet, hdc = half double crochet, st = stich(es)

Dimensions: Approx. 6.5″ square

Round 1: Magic ring, Ch 2, 10dc into magic ring, join to first dc
Round 2: Ch 2, 2dc into each st around, join to first dc 
Round 3: Ch 2, *dc, hdc into next 2 st, dc, [2dc, ch 2, 2dc] all in one st, repeat from * , join to first dc (8 st per side)
Round 4: Ch 2, *dc until you get to the ch 2 space from previous row, [2dc, ch 2, 2dc] all in ch 2 space, repeat from * , dc in next 2 spaces until you get to the beginning of the round, join to first dc (12 st per side)
Round 5: Ch 2, *dc until you get to the ch 2 space from previous row, [2dc, ch 2, 2dc] all in chain 2 space, repeat from * , dc in next 4 spaces until you get to the beginning of the round, join to first dc (16 st per side)
Fasten off and weave in all ends.

The video for the granny square is the same as the Christmas square EXCEPT use a J/6.00mm hook and fasten off after the 5th row. The square will be approx. 6.5″


Be sure to share your work on Maria’s Yarn Friends facebook group or tag me @mariasbluecrayon on Instagram! I love seeing your work!

Filed Under: appliques, crochet Tagged With: CAL, granny square, video

Previous Post: « How to Sew on Crochet Appliques
Next Post: Halloween Blanket Crochet Along – Free Pattern »

Reader Interactions

Comments

  1. Susan Haspeslagh

    July 7, 2018 at 10:42 pm

    I am excited to get started but have a couple questions.
    1) What is the size of the square?
    2) Do the safety eyes poke threw the afghan? Wouldn't they be uncomfortable if you were to wrap it around yourself or sit on?
    3) What is the merge convert thing it keeps asking me to download?
    Thank you for your assistance. Love the video tutorials as I am fairly new to crochet.

    Reply
  2. Unknown

    July 8, 2018 at 4:06 am

    Is each square 7 inches ?? Thank you

    Reply
  3. Morgan Anderson

    July 9, 2018 at 2:01 am

    I'm wondering the same thing as Susan about the safety eyes. How do you keep the end of the eye from poking you? And where do you place the washer?

    Reply

Leave a Reply Cancel reply

Your email address will not be published. Required fields are marked *

Primary Sidebar

Hi, I'm Maria! I'm sharing with you my own free crochet patterns and tutorials, while fulfilling my love for learning and creating with my hands.
I hope you find creativity and inspiration while you're here!

  • Facebook
  • Instagram
  • Pinterest
  • YouTube

Grab Your Free Handy Crochet Cheat Sheet!

Sign up to receive my newsletter full of crochet goodness starting with this handy crochet cheat sheet along with free pattern downloads! Unsubscribe at any time.

Thank you!

Please check your email to confirm subscription.

.

Copyright © 2023 Maria's Blue Crayon on the Foodie Pro Theme