
This post may contain affiliate links. For more information, please see our disclosure policy.
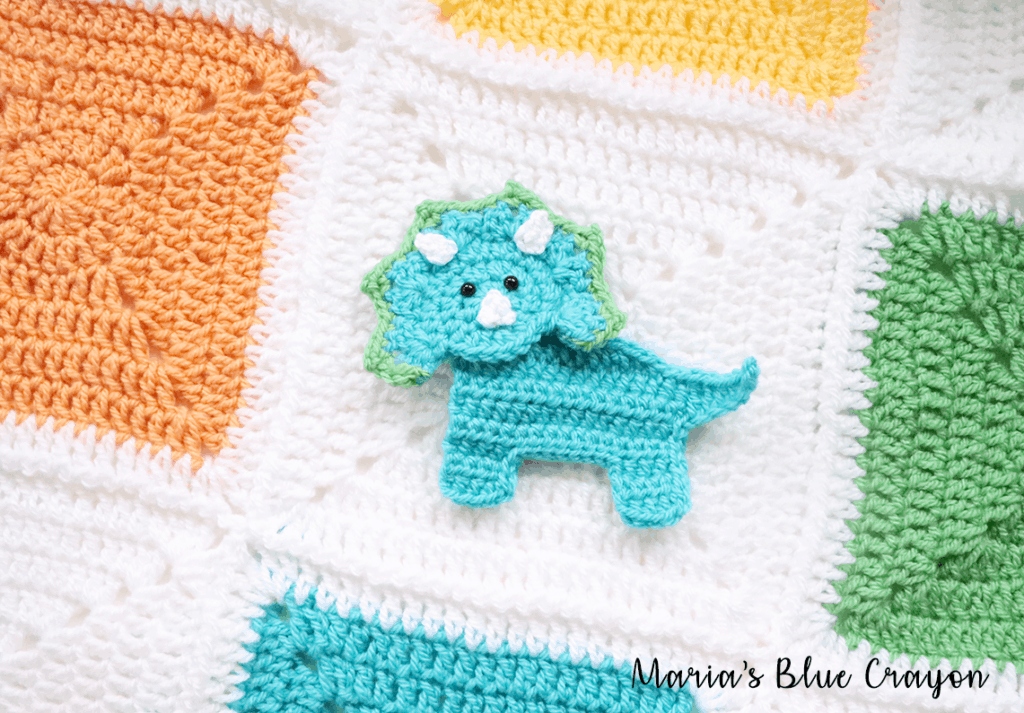
The triceratops applique is part of the crochet dinosaur granny blanket pattern I have on my blog, but this cute little dino can be made to attach to anything! Find the free written pattern and video tutorial below.
If you aren’t familiar with the free crochet dinosaur themed blanket pattern, click here to find all the details!
This triceratops is by far my favorite dinosaur of the bunch! It took me a few tries to get his head shape just right. The little picot stitches around the top are so cute! I’m glad I stuck with trying out different variations until I came up something I was 100% happy with.
Below you will find the video tutorial and under that the written pattern. *Temporarily disable your ad-blocker if you are not able to view the video tutorial directly beneath this text.
Free Crochet Triceratops Pattern
Hooks: G/4.00mm (main dinosaur) and C/2.75mm (horns)
Note: Beginning chains do not count as a stitch.
For the dinosaur-themed blanket: Make one blue with green spikes, make one green with yellow spikes, and make one yellow with orange spikes.
Head G/4.00mm
Round 1: Magic ring, ch 2, 10 hdc in ring, join to first hdc (10)
Round 2: Ch 2, 2hdc in each st around, join to first hdc (20)
Round 3: Ch 2, *2hdc, hdc, repeat from * 6 more times, turn (21)
Round 4: Ch 2, *(2dc, ch 1, 2dc) in same sp, sk 1, sl st in next st, sk 1, repeat from * around, (2dc, ch 1, 2dc, sl st) in last st, turn
Change to second color
Round 5: Ch 1, *sc until you get to ch 1 sp from previous row, (sc, ch 2, sc) in ch 1 sp, repeat from * around, sc into the remaining st, sl st into side of last sc
Fasten off and leave tail for sewing.
Horns C/2.75mm & white yarn
Row 1: Ch 3, sc in 2nd ch from hook and across, turn
Row 2: Ch 1, sc2tog
Fasten off and leave tail for sewing.
Make two and sew onto head using the photo as a guide.
Nose Horn C/2.75mm hook & white yarn
Ch 3, sc in 2nd ch from hook, sc in last ch, fasten off.
Configure so it looks like a triangle. Sew onto face using photo as a guide.
Body G/4.00mm
Row 1: Ch 16, hdc in 3rd ch from hook and across, turn (14)
Row 2-3: Ch 2, hdc across, turn (14)
DO NOT FASTEN OFF.
Legs
Row 1: Ch 2, hdc in next 4 st, turn (4)
Row 2-3: Ch 2, hdc across, turn (4)
Sl st up side of leg until you get to the sp where the leg meets the body
Continue to work under the body: sl st into the next 7 st
Leg #2:
Row 1: Ch 2, hdc in same st as last sl st, hdc in next 3 st, turn (4)
Row 2-3: Ch 2, hdc across, turn (4)
Sl st up side of leg and back of body until there are 2 rows left of the body.
DO NOT FASTEN OFF.
Tail
Ch 7, sc in 2nd ch from hook, hdc in next 2 ch, dc in next 2 ch, tr in last ch, join to top right corner of body.
DO NOT FASTEN OFF.
Back
Continue to work the follow to finish up the back:
sc in next 2 st, hdc in next 2 st, dc in next 4 st, hdc in next 2 st, sc in next 2 st, sl st in next 2 st.
Fasten off and leave tail for sewing.
Attach safety eye using photo as guide.
Granny Square Pattern
Note: If you are NOT joining as you go, add a 7th row and change 7th row to white.
Dimensions: 8″ square
J/6.00mm hook
Round 1: Magic ring, ch 2, 10 dc in ring, join to first dc (10)
Round 2: Ch 2, 2dc in each st around, join to first dc (20)
Round 3: Ch 3 (counts as stitch), (dc, ch 2, 2dc) in same st as ch 3, dc, hdc in next 2 st, dc, *(2dc, ch 2, 2dc) all in next st, dc, hdc in next 2 st, dc, repeat from * around, join to beginning ch 3 (each side of square will have 8 st)
Round 4: Sl st to ch 2 space from previous row, Ch 3 (counts as st) (dc, ch 2, 2dc) all in same ch 2 space, dc across, *(2dc, ch 2, 2dc) all in ch 2 space from previous row, dc across, repeat from * around, join to beginning ch 3 (each side of square will have 12 st)
Round 5-6: Repeat Round 4 (Each side will grow by 4 stitches after each round)
Fasten off and weave in ends.
Granny Square Video
Temporarily disable your ad-blocker if you are unable to view the video tutorial below.
Hi Marie , I love your cal. Thanks for doing it. My solid granny squares aren’t measuring 8”. Should I do a few more rounds on each block or should I just do more squares in the end to make the blanket the right size. Mine are measuring 6.5”. Thanks.
You can either go up a hook size and that can help or you can add another round to your squares!