This post may contain affiliate links. For more information, please see our disclosure policy.
Using the bobble stitch and a graph, these crochet potholders are double thick, adorable, and practical for every day use. Whether you are new to crocheting graphs or already have this skill under your belt, this is a fun project to complete in a weekend or a cozy night in.
- Grab the PDF download/printable on Etsy or Ravelry. PDF includes graph along with row by row instructions.
- PIN it to your Pinterest boards for later.
- View the pattern and download the graph below here on my blog.
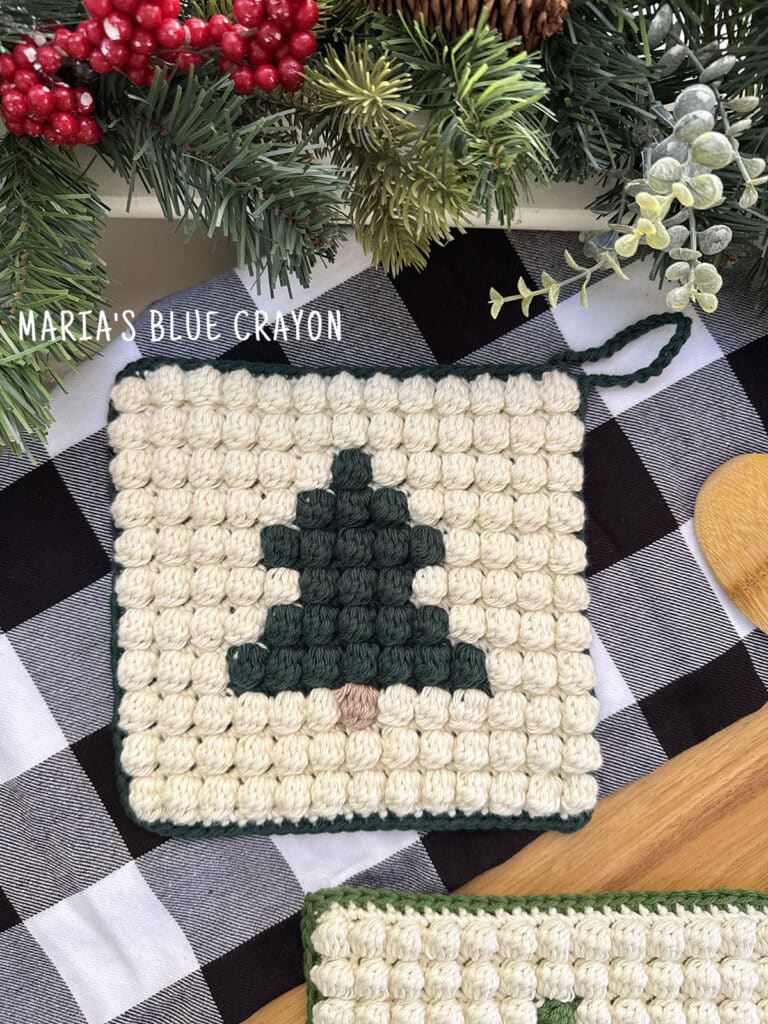
Materials for Crochet Potholders
100% cotton yarn is needed to make potholders. Because we are using them for hot pots and dishes, they need to withstand the heat and be durable. Acrylic yarn is not reccomended because the fibers can melt.
For this specific pattern, I used a worsted-weight cotton yarn. I Love This Cotton! and Knit Picks Dishie are great options for this project.
Crochet Bobble Graph
If you haven’t crocheted a bobble graph before, I think this one is simple enough that it would be a good starting point. The video tutorial includes how to read the graph as well as the first several rows of completing the bobble graph.
Essentially, you are crocheting rows of single crochets and then a row of bobble crochets while following the chart on where to change colors. Once you get a few rows started and a few color changes in, you should be good to go!
You can either work from the graph exclusively, or you can follow the pattern that is written out row by row. If you are reading the pattern, be sure to read the “how to read this pattern” note before starting and check in on the graph every so often to make sure you are on the right track. Both graph and written pattern are provided below on my blog.
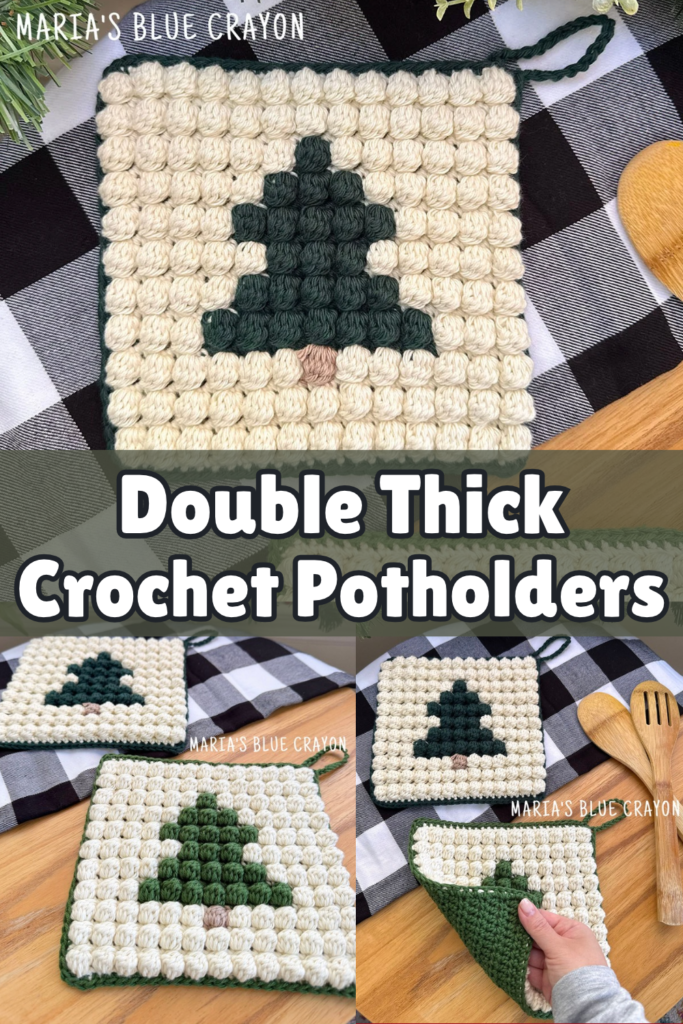
Double Thick Crochet Potholder Pattern Overview
As the name states, this potholder is double thick which means it’s made up of two panels. Once both panels are made, they are then crocheted together with single crochets.
The front panel is the part where we will be following the graph and crocheting with bobble stitches to create the tree picture. The bobble stitches are 3D and provide plenty of texture and thickness to this potholder, but I wanted to make a back panel as well to polish it up and make it look complete.
The back panel is made of half double crochet rows. This part is very easy.
Once both panels are crocheted, you will hold the pieces together (front panel on top) and crochet them together using single crochets. I also added a little loop to the corner of my potholder. The loop will be made in the same round that we are single crocheting the panels together but you can also opt out of making it if you prefer.
This potholder comes together fairly quickly and you will want to make a bunch once you finish the first one!
Tips on Color Changing
To keep your color changes clean, I recommend changing yarn colors before finishing the last stitch in between colors. You can see how I change colors in the video tutorial provided.
There are different methods in color changing when crocheting graphs. I used the “bobbin method” which prevents any cutting of yarn within the rows. I find this method the best for this project specifically because it is a pretty simple graph with only a few colors and color changes within the row.
To use the bobbin method for this project, you will either need two skeins of ivory or split your skein of ivory yarn in half. You will see how I utilize both skeins at once in the video tutorial provided.
Feel free to use what color changing method you like best!
Crochet Double Thick Potholder Video Tutorial
Double Thick Crochet Potholder Pattern
Materials
100% cotton, worsted weight (medium) yarn
(I used I Love This Yarn! In Ivory, Khaki, and Forest and Knit Picks Dishie in Jalapeno)
5.00 mm crochet hook
Tapestry needle/Scissors
Notes
The pattern written out below follows the graph provided. Each line goes through stitches needed to be made as well as the colors.
If you know how to follow a bobble graph, feel free to use the graphs vs the written instructions. If you would like to learn how to read and follow a bobble graph, the video tutorial goes over that as well.
Video Tutorial: https://youtu.be/RkLEWnqQtuQ
Dimensions: 8″ x 7″
Abbreviations: (US terms)
Ch = chain, sc = single crochet, hdc = half double crochet, st = stitch
Tree Graph
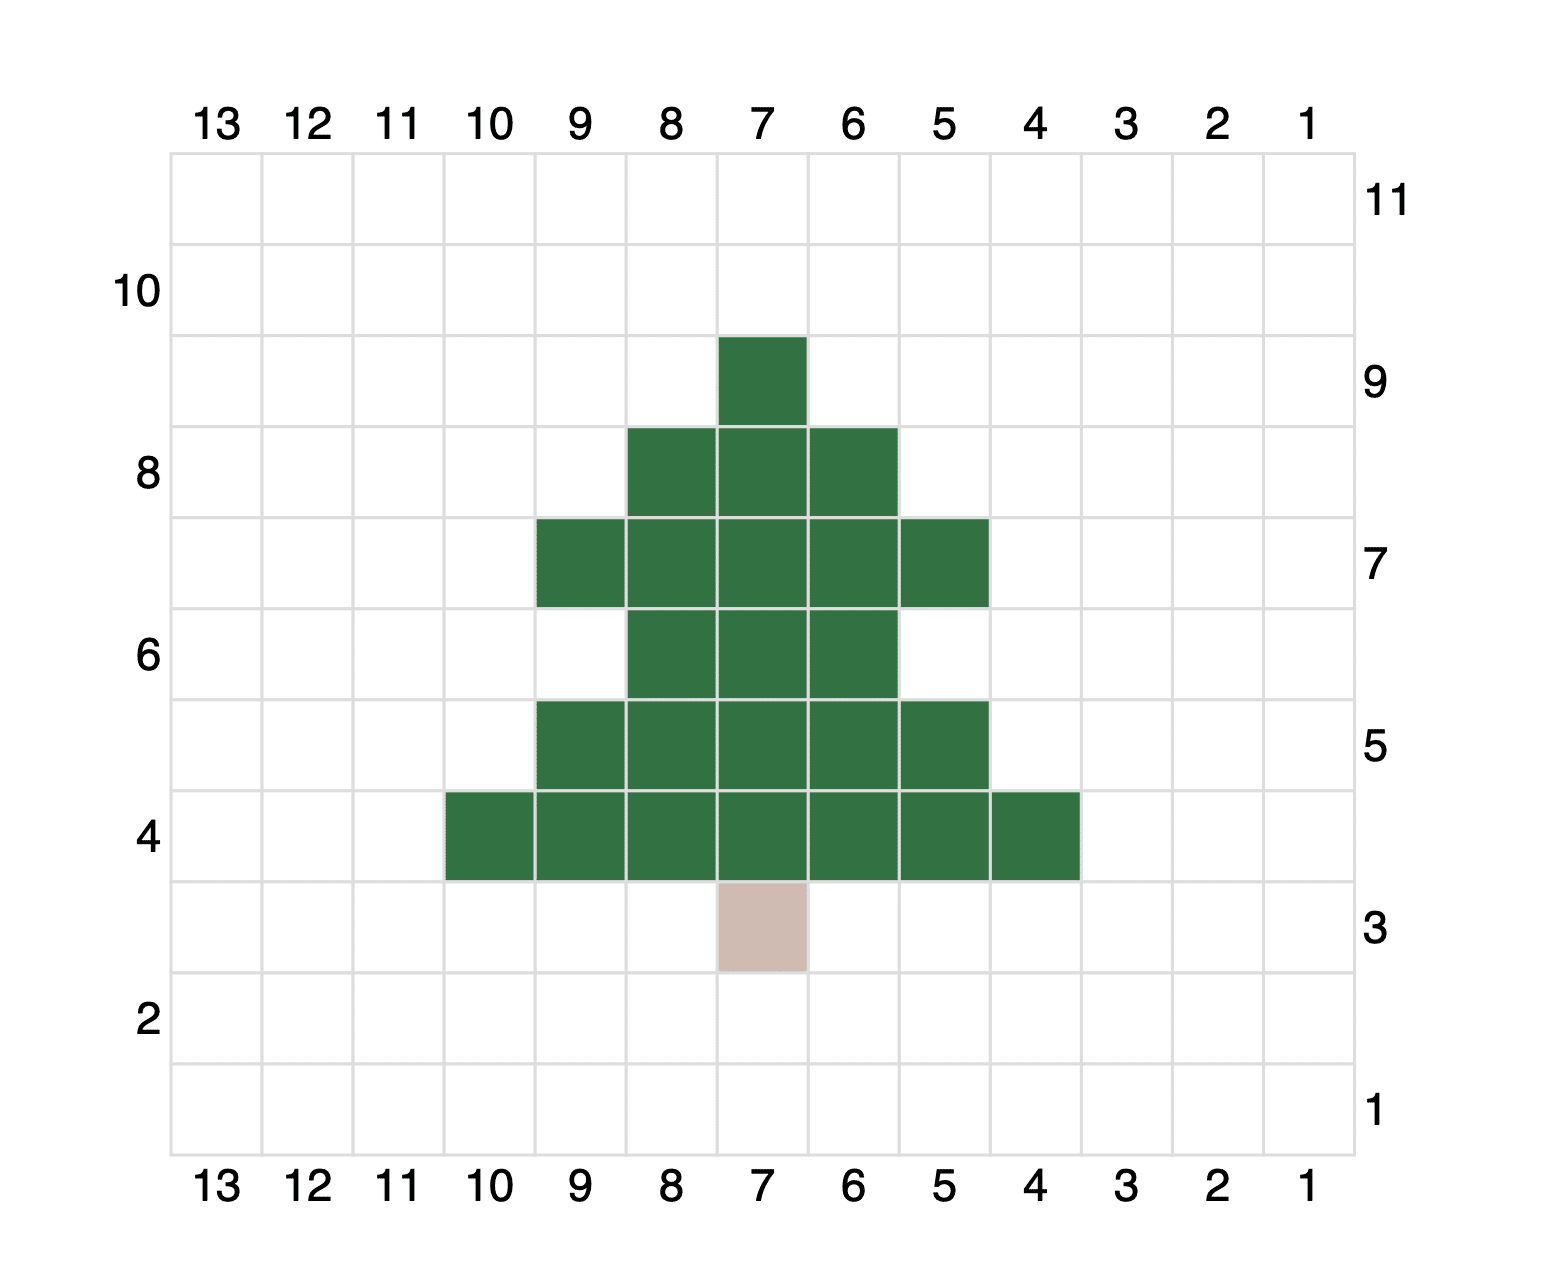
How to read this pattern
**Each “bobble” will be a bobble stitch and a single crochet stitch. For example, if the pattern reads “1 green bobble”, you will use the green yarn to make one bobble stitch and one single crochet in the stitch after it.
You will need to change colors within the row by method of your choice. For this graph, I was able to use two different skeins of ivory and continue on with the yarn after each row instead of having to cut the yarn. This is known as the ‘bobbin method’.
Start each bobble stitch row with ch 2 and each single crochet row with ch 1.
Pattern
Front Panel
Start with Ivory yarn.
Row 1: Ch 27, sc in 2nd ch from hook and in each ch across, turn
Row 2: 13 Ivory bobbles
Row 3: 26 ivory sc
Row 4: 13 ivory bobbles
Row 5: 12 ivory sc, 2 khaki sc, 12 ivory sc
Row 6: 6 ivory bobbles, 1 khaki bobble, 6 ivory bobbles
Row 7: 6 ivory sc, 14 green sc, 6 ivory sc
Row 8: 3 ivory bobbles, 7 green bobbles, 3 ivory bobbles
Row 9: 8 ivory sc, 10 green sc, 8 ivory sc
Row 10: 4 ivory bobbles, 5 green bobbles, 4 ivory bobbles
Row 11: 10 ivory sc, 6 green sc, 10 ivory sc
Row 12: 5 ivory bobbles, 3 green bobbles, 5 ivory bobbles
Row 13: 8 ivory sc, 10 green sc, 8 ivory sc
Row 14: 4 ivory bobbles, 5 green bobbles, 4 ivory bobbles
Row 15: 10 ivory sc, 6 green sc, 10 ivory sc
Row 16: 5 ivory bobbles, 3 green bobbles, 5 ivory bobbles
Row 17: 12 ivory sc, 2 green sc, 12 ivory sc
Row 18: 6 ivory bobbles, 1 green bobble, 6 ivory bobbles
Row 19: 26 ivory sc
Row 20: 13 ivory bobbles
Row 21: 26 ivory sc
Row 22: 13 ivory bobbles
Row 23: 26 ivory sc
Fasten off. Weave in ends.
Back Panel
Use green yarn
Row 1: Ch 27, hdc into 2nd ch from hook and across, turn
This should match the width of your graph panel. You can add or subtract stitches as needed.
Row 2: Ch 1, hdc in each st across, turn
Repeat until you have a total of 19 rows or until it matches the height of your graph panel. Fasten off and weave in ends.
Assembly
Hold panels together with the bobble graph on top. Use green yarn and single crochet together both pieces, start at the top right corner. Make 3sc in the corners. Before joining to the first st, ch 20, join to first st. Fasten off and weave in ends.
Leave a Reply