This post may contain affiliate links. For more information, please see our disclosure policy.
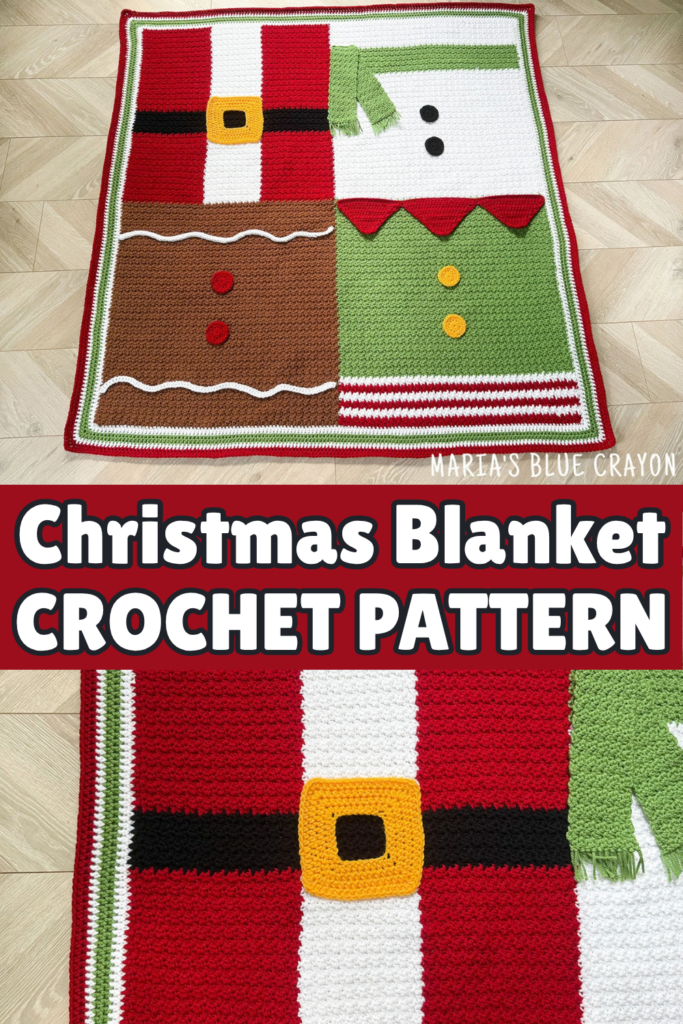
Cozy up this season with this festive crochet Christmas blanket. This easy to follow crochet pattern is completely free – grab your hooks and let’s get started!
- Grab the printable/download PDF on Etsy or Ravelry.
- PIN it to your boards for later.
- Find the free crochet Christmas blanket pattern below.
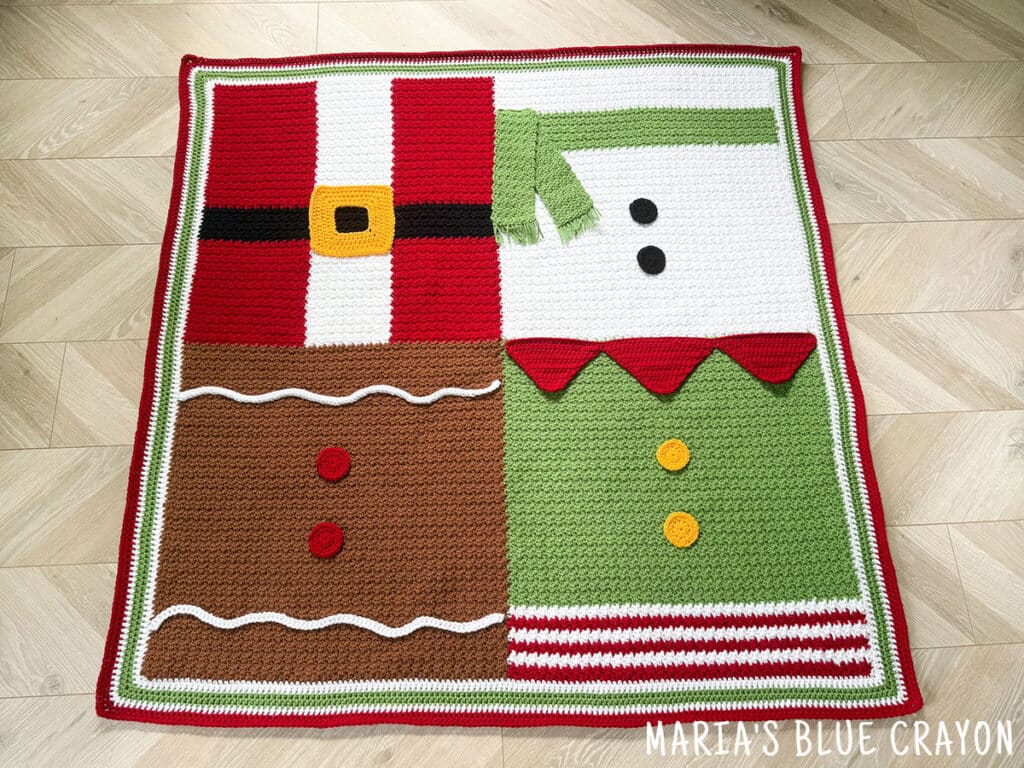
This Christmas blanket was inspired by my crochet Christmas pillows that I made a few years ago. Those pillows were a fan favorite so I knew I had to make a blanket to make it a whole set! I love getting my Christmas pillows out year after year and now I will also have the blanket to bring out every year to decorate.
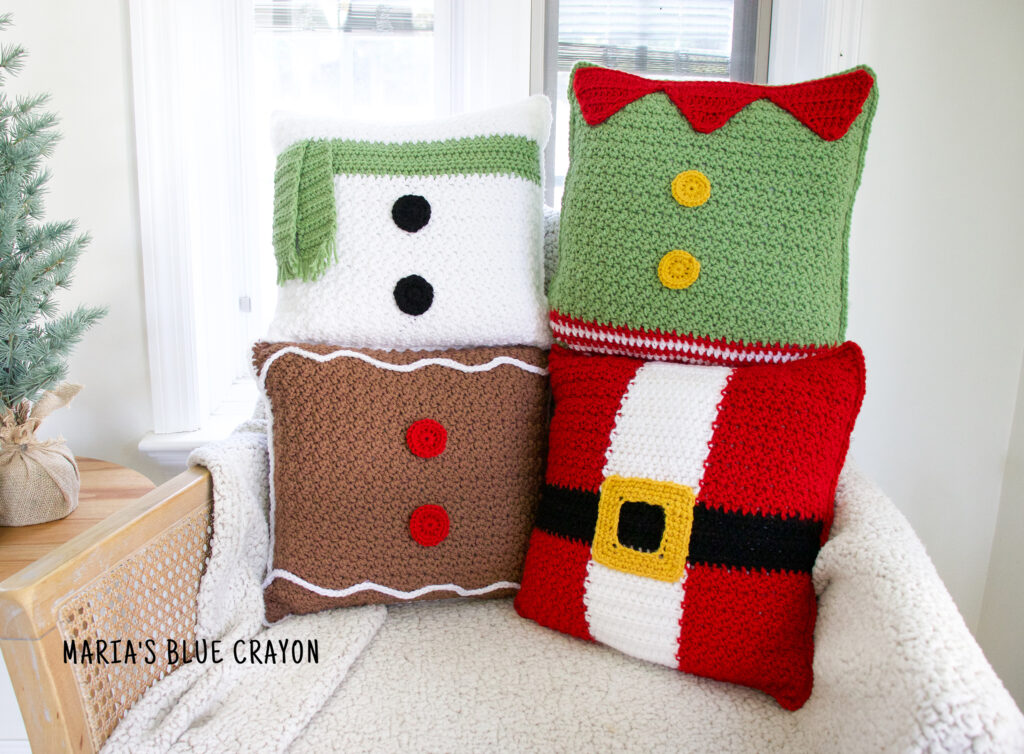
*I will link all the different crochet pillow patterns below after the pattern so if you haven’t gotten a chance to make them, you can add them to your list!
This design is simple yet impactful. We have all the traditional Christmas characters – a snowman, Santa, an elf, and a gingerbread. For the border, I chose to do a simple half double crochet in white, green, and red. I really wanted to keep this pattern simple and easy to make.
Materials for the Christmas Blanket
You will need worsted weight yarn in the following colors: white, red, green, brown, black, and gold/yellow. Specific amounts can be found in the materials section in the written crochet pattern.
I used the brand Big Twist from Michael’s. I was able to grab all of them at once while they were on sale. I Love This Yarn! is also a good option for this blanket.
For the crochet hook, I used a 6.00 mm/J hook. You may need to go up or down a hook size depending on your gauge but it’s not absolutely necessary for a blanket. I tend to crochet a bit loose. The gauge can be found in the crochet pattern if you’d like to check it.
A tapestry needle and scissors are needed for weaving in ends and sewing. Depending on if you decide to sew on the embellishments or glue them on, you may also need fabric glue. You can read more about it in the pattern overview below.
Crochet Christmas Blanket Pattern Overview
If you know basic crochet stitches, I’m confident that you will be able to complete this project. The entire base of this blanket is made with just single crochets and double crochets. It creates a pretty, subtle texture while providing a mindless and relaxing experience to crochet. I watched many shows and movies while crocheting this blanket!
There are color changes within the blanket to make the base of the blanket all one piece. I do have a tutorial on how I like to change my yarn colors within the row, but you can use any method you prefer or see fit.
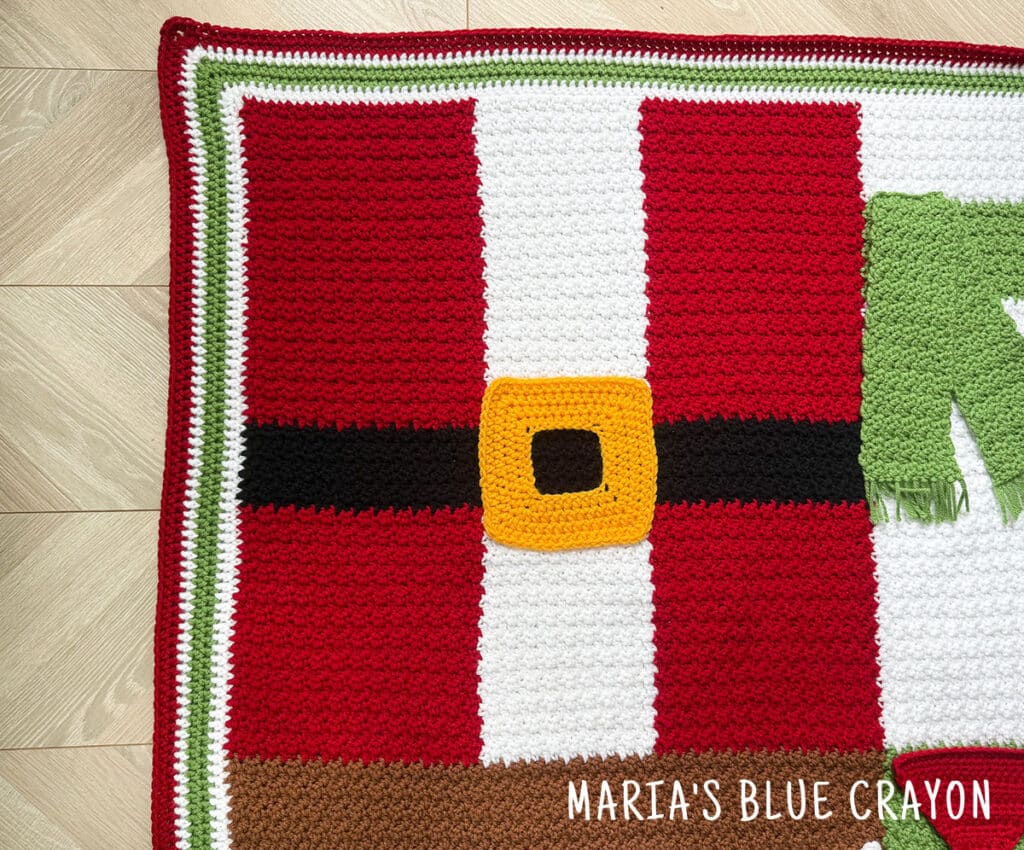
There are some embellishments that are crocheted separately then attached. Santa’s belt buckle, part of the snowman scarf, buttons, the elf collar and buttons, as well as the gingerbread buttons and icing are crocheted after the base of the blanket is complete.
These extra pieces take much less time than the base of the blanket. You can either sew the pieces on or use fabric glue to attach them. Sewing is the best, more secure method but I always take the short cut and prefer to glue them down.
If you do sew the pieces on, I have a tutorial on how to do so without it showing on the backside of the blanket. You essentially are whip stitching the embellishments to the top of the blanket. You can see the video tutorial here on how I do this.
Once the embellishments are attached, weave in your ends and enjoy!
Crochet Christmas Blanket Pattern
Materials
Big Twist (worsted weight, medium 4, 380yds/skein) 2 skeins Deep Red, 2 skeins White, 2 skeins Toffee, 2 skeins Light Green, 1 skein Black, 1 skein Varsity Gold
6.00 mm crochet hook
Tapestry needle + Scissors
Fabric glue (optional)
Pattern Notes
The base of the blanket will be made first and embellishments (buttons, belt buckle, scarf tassels, etc) are made separately and attached.
The base of the blanket will be made by changing colors within the row so it is all made in one piece. I have a video tutorial on how to do this from another blanket I’ve made: https://youtu.be/e4dnNnE_cOU?si=ZDc1ghh91StetUqa
Embellishments for each of the squares were glued on. You can chose to sew these on for a more secure attachment method.
For a clean backing, follow this tutorial for sewing: https://youtu.be/CRpGMPp0ALc?si=vYoIeIE1TdOWnuVU
Foundation single crochet tutorial: https://youtu.be/iXapNABdP1Q?si=f8sW_mTySm-k33tl
Beginning chain of each row in the main blanket does not count as a stitch.
Dimensions: 54” x 54”
Gauge: 4” x 4” ~ 11 st x 10 rows using the griddle st (alternating sc and dc)
Abbreviations: (US terms)
Ch = chain, sc = single crochet, hdc = half double crochet, dc = double crochet, hdc2tog = half double crochet two together, st = stitch
Blanket Pattern
Use brown yarn.
Row 1: Ch 68, change to red yarn, ch 70, dc into 3rd ch from hook, sc in next st, *dc in next st, sc in next st, repeat from * across, changing to brown yarn once you get back to the brown chains, turn
Row 2: Ch 2, dc in first st, sc in next st, *dc in next st, sc in next st, repeat from * across, changing to red yarn when you get to the red stitches, turn
Change to white yarn.
Row 3: Ch 2, dc in first st, sc in next st, *dc in next st, sc in next st, repeat from * across, changing to brown yarn when you get to the brown stitches, turn
Row 4: Ch 2, dc in first st, sc in next st, *dc in next st, sc in next st, repeat from * across, changing to white yarn when you get to the white stitches, turn
Change to red yarn.
Row 5: Ch 2, dc in first st, sc in next st, *dc in next st, sc in next st, repeat from * across, changing to brown yarn when you get to the brown stitches, turn
Row 6: Ch 2, dc in first st, sc in next st, *dc in next st, sc in next st, repeat from * across, changing to red yarn when you get to the red stitches, turn
Change to white yarn.
Repeat Rows 3-4
Change to red yarn.
Repeat Rows 5-6
Change to white yarn.
Repeat Rows 3-4
Change to green yarn.
Row 13-64: Ch 2, dc in first st, sc in next st, *dc in next st, sc in next st, repeat from * across, changing yarn colors to match previous row
At this point, the squares for the elf and the gingerbread are done. The embellishments will be made separately at the end and attached.
We will move onto the snowman and Santa squares.
Change to white yarn.
Row 65: Ch 2, dc in first st, sc in next st, *dc in next st, sc in next st, repeat from * across changing to red yarn when you get to the brown stitches, continue to repeat for 25 st, change to white yarn, continue to repeat for 18 st, change to red yarn, continue to repeat until the end of the row, turn
Row 66-88: Ch 2, dc in first st, sc in next st, *dc in next st, sc in next st, repeat from * across changing colors to match previous row, turn
Rows 65-88 will be a total of 24 rows.
Row 89: Ch 2, dc in first st, sc in next st, *dc in next st, sc in next st, repeat from * across changing to black yarn once you get to the red stitches, continue to repeat across, turn
Row 90-96: Ch 2, dc in first st, sc in next st, *dc in next st, sc in next st, repeat from * across changing colors to match previous row, turn
Row 97: Ch 2, dc in first st, sc in next st, *dc in next st, sc in next st, repeat from * across changing to red yarn once you get to the black stitches, continue to repeat across for 25 st, change to white yarn, continue to repeat across for 18 st, change to red yarn, continue to repeat across, turn
Row 98-108: Ch 2, dc in first st, sc in next st, *dc in next st, sc in next st, repeat from * across changing colors to match previous row, turn
Change to green yarn.
Row 109-118: Ch 2, dc in first st, sc in next st, *dc in next st, sc in next st, repeat from * across changing colors to match previous row, turn
Change to white yarn.
Row 119-128: Ch 2, dc in first st, sc in next st, *dc in next st, sc in next st, repeat from * across changing colors to match previous row, turn
Fasten off. We will work on the border next.
Border
Attach white yarn to corner of blanket.
Row 1: Ch 1, 3sc, sc evenly around, making 3 sc in each corner, join to first st
Row 2: Ch 1, hdc around, making 3hdc in each corner, join to first st
Change to green yarn.
Row 3-4: Ch 1, hdc around, making 3 hdc in each corner, join to first st
Change to white yarn.
Row 5: Ch 1, hdc around, making 3hdc in each corner, join to first st
Change to red yarn.
Row 6-7: Ch 1, hdc around, making 3hdc in each corner, join to first st
Fasten off and weave in all ends.
We will now work on the embellishments for each square. Instructions on how to sew on the embellishments are in the notes. You can also attach with fabric glue. Use the photo as a guide to attach all embellishments.
Snowman Embellishments
Scarf
Use green yarn.
Row 1: Ch 12, dc in 3rd ch from hook, sc in next ch, *dc in next ch, sc in next ch, repeat from * across, turn
Row 2-26: Ch 1, dc in first st, sc in next st, *dc in next st, sc in next st, repeat from * across, turn
Fasten off. Make tassels/fringe for the end of the scarf. Make two pieces.
Buttons
Use black yarn.
Round 1: Magic ring, ch 1, 10hdc in ring, join to first st
Round 2: Ch 1, 2hdc in each st around, join to first st
Fasten off. Leave tail for sewing or weave in ends. Make two buttons.
Santa Embellishments
Belt Buckle
Use gold yarn.
Round 1: Ch 32, join to first ch
Round 2: Ch 1, 3hdc in first st, *hdc in next 7 st, 3hdc in next st, repeat from * around, hdc in remaining st, join to first st
Round 3: Ch 1, hdc in first st, *3hdc in next st, hdc in next 9 st, repeat from * around, hdc in remaining st, join to first st
Round 4: Ch 1, hdc in next 2 st, *3hdc in next st, hdc in next 11 st, repeat from * around, hdc in remaining st, join to first st
Round 5: Ch 1, hdc in next 3 st, *3hdc in next st, hdc in next 13 st, repeat from * around, hdc in remaining st, join to first st
Fasten off. Leave tail for sewing or weave in ends.
Elf Embellishments
Collar
Use red yarn.
Row 1: Ch 69, hdc into 2nd ch from hook and in each ch across, turn
We will start work on the individual triangles of the collar.
Row 2: Ch 1, hdc2tog over first 2 st, hdc in next 18 st, hdc2tog over next 2 st, turn
Row 3-10: Ch 1, hdc2tog over first 2 st, hdc across until last 2 st, hdc2tog over last 2 st, turn
Row 11: Ch 1, hdc2tog over first 2 st, hdc2tog over last 2 st
Fasten off.
Attach yarn next to first triangle to start the middle triangle of the collar
Row 1: Ch 1, hdc2tog over next 2 st, hdc in next 20 st, hdc2tog over next 2 st, turn
Row 2-10: Ch 1, hdc2tog over first 2 st, hdc across until last 2 st, hdc2tog over last 2 st, turn
Row 11: Ch 1, hdc2tog over first 2 st, hdc2tog over last 2 st
Fasten off.
Attach yarn next to middle triangle to start the last triangle of the collar.
Row 1: Ch 1, hdc2tog over first 2 st, hdc in next 18 st, hdc2tog over next 2 st, turn
Row 2-9: Ch 1, hdc2tog over first 2 st, hdc across until last 2 st, hdc2tog over last 2 st, turn
Row 10: Ch 1, hdc2tog over first 2 st, hdc2tog over last 2 st
Fasten off. Leave tail for sewing or weave in ends.
Buttons
Use gold yarn.
Round 1: Magic ring, ch 1, 10hdc in ring, join to first st
Round 2: Ch 1, 2hdc in each st around, join to first st
Fasten off. Leave tail for sewing or weave in ends.
Make two buttons.
Gingerbread Embellishments
Buttons
Use red yarn.
Round 1: Magic ring, ch 1, 10hdc in ring, join to first st
Round 2: Ch 1, 2hdc in each st around, join to first st
Fasten off. Leave tail for sewing or weave in ends.
Make two buttons.
Icing
Use white yarn.
Make 80 foundation single crochets OR ch 81, sc in 2nd ch from hook and in each ch across, fasten off
Make two. Leave tail for sewing or weave in ends.
What’s Next?
Crochet Christmas Pillows
Crochet these Christmas pillows if you haven’t already!
Leave a Reply